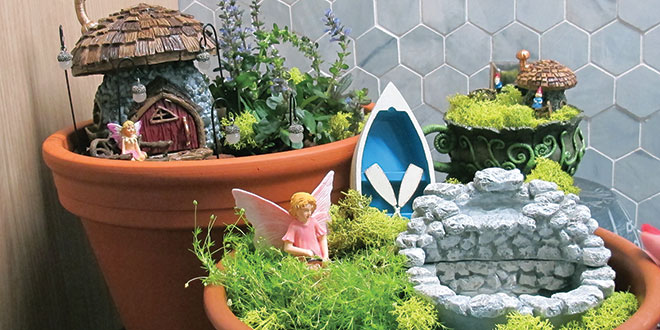
The Hardware Retailing team is always on the lookout for trends that can help retailers drive traffic. In this month’s issue, we highlight four unique niches found in the lawn and garden category, including the growing trend of putting together fairy gardens, which are indoor and outdoor miniature gardens with plants and tiny figurines. If you decide to try this niche, consider creating your own fairy garden to display the products you sell and inspire your customers to give the hobby a try.
Hardware Retailing staffers stopped by Sullivan Hardware & Garden in Indianapolis to get some tips on fairy gardening and buy greenery, potting soil and other products needed for the project. Follow the steps here to see the project from start to finish.
 Step 1: Gather Items
Gather all of the items you need for your tiny garden, such as flower pots, potting mix, gardening gloves, plants and, of course, fairies. We used fairy homes and other accessories contributed by Georgetown Home & Garden, a manufacturer that creates a wide assortment of detailed fairy garden products. Accessories you sell could include mini houses, water features, benches and figurines.
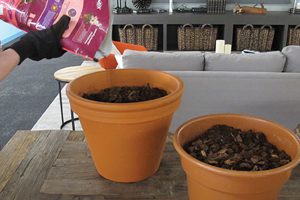 Step 2: Fill Containers
Once you have collected your pots, plants and accessories, pour potting mix into the containers you’d like to use. We used a clay pot, a plastic pot and a large teacup, but feel free to be creative with other options, such as birdbaths, barrels and old wagons.
 Step 3: Plant the Greenery
Next, take a look at the live plants you have and position them where you’d like them in the containers. Keep in mind where you want to place your largest fairy accessories so that your containers will have space for them and you won’t need to uproot any plants.
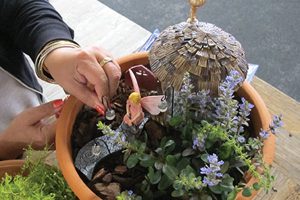
 Step 4: Prioritize Larger Items
Once you’ve put your plants where you want them, add in larger accessories. For our project, we had two miniature homes and a waterfall.
 Step 5: Insert Little Details
Once your larger items and plants are in place, you get to have fun with the smallest details. Add little accessories, such as a pathway to the house, miniature lanterns and tiny garden gnomes.
 Step 6: Add Pizzazz
We incorporated a waterfall with a pump mechanism and running water into our garden. If you decide to add a plug-in water element, read the instructions to set it up correctly. We also added jewels for a pop of water-blue color to go along with the waterfall, and a fairy boat.
 Step 7: Make Final Touches
Give your fairy garden project finishing touches. You may also want to spritz the live plants with a spray bottle of water. Misting the plants to water them will prevent you from washing away any fairy landscaping.
 Step 8: Enjoy the View
When we finished arranging our gardens in the flower pots and teacup, we turned on the waterfall pump and enjoyed our whimsical creation. You should take time with your employees to enjoy the view, too.
When your fairy garden is done, place it in a prominent location within your store to give your customers project ideas. Assign an employee the task of watering the plants.
You may also want to add or change out accessories to showcase seasonal items or new products throughout the year.